|
|
|
How To Set Up Debian Linux Internet Servers
The material on this page was prepared using Sarge or Etch
configured using our Installation and Packages pages.
If you did not use our pages to set up your system, what you
encounter on your system may be different than what is given here.
While Linux/UNIX can be used as a workstation OS it's real power shows itself when used as a server. The lean structure of Debian allows even an old Pentium system to operate as a server. And the fact that Web (Apache) and e-mail (Sendmail) server applications are free and included with Debian, once you've set up a Debian system all you have to do is install the Apache and Sendmail packages and you're in business.
On this page we'll show you how to set up the two most common types of Internet servers. A server running Apache to act as an external (Internet) or internal (Intranet) Web Server, and an e-mail server running Sendmail which is the most widely used e-mail server software on the Internet. Note that this is not an either/or proposition. You can run Web and e-mail server services simultaneously on the same system.
It's not really accurate to categorize Web and e-mail servers as "Internet servers". Web servers are often used for internal Intranet sites and most organizations have internal mail servers so that co-workers can e-mail each other. So while these servers could also be categorized as "LAN servers", we have them on this page because they are the two most common types of Internet servers.Setting up the Web and e-mail servers is only half of it. Without DNS services no one will be able to get to them. On the DNS page we showed you how to set up DNS services using either your own server or a third-party, including the free dynamic DNS service that you can use for home and test servers.
If you want to set up a serious Web server you'll want some kind of scripting capability. The Apache install sets up CGI (Common Gateway Interface) automatically. With CGI the code that gets executed are stored in separate files on the server in a cgi-bin directory. With CGI you can run plain-text scripts that get compiled into an executable each time they are run, such as with Perl scripts, or they can be pre-compiled executables written in a language like C. The big advantage of CGI scripts is that, because they're stored in individual files, there are literally thousands of free CGI scripts available on the Internet that you can download and use on your Web sites. You don't have to learn how to program in a given scripting language to take advantage of scripts. For more information on CGI and Perl, see our CGI/Perl tutorial page.
Another approach to Web scripting is to embed the script code in the HTML documents. This is the approach taken with PHP, Microsoft's ASP, and ColdFusion and you have to learn how to program in these languages to use them. (When you're surfing the Web you'll often see Web pages in your browser's location line with extensions like .php, .asp, and .cfm which indicates the pages were written with this scripting approach.) The Web server parses pages with these extensions, picks out the embedded script code, and executes the script code before sending the page to the browser. Any results of the script execution are displayed in the page at the same location the script code is located in the HTML document. This scripting approach is the desired approach for Web developers who wish to have their Web pages access back-end databases.
This page will also show you how to add PHP capability to your Web server and how to install MySQL to serve as a back-end database. PHP4 also supports connecting to Microsoft databases by offering connections to SQL Server and via ODBC drivers. If you're interested in XML development, PHP also has XSLT support. In addition, there are a lot of "phpgroupware" packages for adding functions like calendar, chat, forum, polls, and projects.
A Note About Windows Web Servers
Back on the Linux Basics page we outlined the cost differences in setting up a Linux Web/E-mail server vs a Windows Web/E-mail server ($20 vs $14,680 for 100 users). Some may feel they're tied to the Windows platform because they have a significant investment in ASP Web page development.
Good news! There's a package from Sun called JSASP (formerly ChiliASP by Chilisoft) which will allow you to run ASP pages on Apache Web servers.
Back on the Networking page we mentioned that if you plan to set up your own serious Web server you'll want to have a symetrical broadband connection to the Internet with a static IP address. However, if you just want to set up a Web or e-mail server to play around with you can do so even if you connect to the Internet via a modem.
Most of the applications that run on servers are "daemons" (pronounced dee-mons). Daemons are applications that run in the background, waiting for some specific event to trigger them, such as an incoming request from a Web browser. Don't confuse daemons with "processes". Processes are "instances" of an application running in memory. For example, the Apache Web server daemon can kick off multiple Apache processes to handle simultaneous requests from multiple browsers. You can see what processes are currently running in your system's memory by typing in the command:
ps -aux
If you installed the Apache Web server software back on the Packages page, you'll see multiple Apache processes running. This number of initial processes is configurable, and if requests from more Web browsers come in than there are processes running, the Apache daemon will kick off more. Other programs will never have more than a single instance (process) running. The number of processes an application will kick off (single or multiple) to handle the load will depend on the design of the application.
Your Home Web Server
While not sufficient for a large Web site that receives a lot of hits, you can use your cable or DSL connection to set up a legitimate Web server at home. Just keep in mind that when you do this you open up your system to traffic from all over the world and there are a lot of hackers out there, so be sure to harden your Web server before going live (see the Security page for more information).
We're going to assume you already have a broadband connection and a cable/DSL router which allows multiple computers on your home network to share the connection, and that your Debian system is configured to access the Internet through the router. The cable/DSL router may act as a DHCP server dishing out IP addresses to systems on your home network (Linksys typically dishes out addresses from 192.168.1.101 and higher). However, your Debian server needs to have a static IP address (something like 192.168.1.40).
With a broadband router in place and your Debian system configured with a static address and able to access the Internet through the router, the steps to setting up a home Web server are fairly simple:
- Install and configure Apache (next section).
- Create your HTML and graphics files for your Web pages and FTP them onto your server (they go into the /var/www directory). If you're not a Web developer you can just Google for "free html templates" to get a kick start on creating your HTML pages.
- Set up an account with an organization like EasyDNS to register your domain name and provide DNS resolution services for your domain name (we show you how on the DNS page).
- Configure EasyDNS to use Dynamic DNS for your domain (also on the DNS page).
- Install the ddclient package on your Debian system and configure it to send updates to your EasyDNS account (also on the DNS page).
- Set your cable/DSL router to route all incoming (from the Internet) TCP traffic destined for
port 80 (Web traffic) to your Debian system.
That's it! You're live on the 'Net! Actually, it'll take a few hours for your DNS information (the information ddclient is sending to EasyDNS) to get propogated to the DNS servers of ISPs, but anyone anywhere should be able to browse to your Web server using your domain name by the next day.
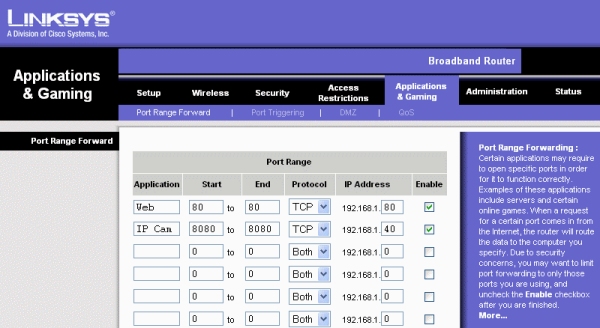
Setting the cable/DSL router to forward all incomingport 80 TCP traffic to your Debian system depends on what type of router you have. On a Linksys router, the port forwarding is found under the "Applications and Gaming" section of the router configuration.

Note that in this example we're assuming your Debian server's static IP address is 192.168.1.80. Be sure to click on the "Save Settings" button at the bottom of this page after entering your port forwarding numbers.
If you are currently using a Web hosting service to host a Web site that doesn't get a lot of traffic, you may want to consider using your home broadband connection to bring your Web site "in house" to save some money. The Easy DNS service is only $35 per year ($55/year if you want to receive e-mail at your domain name) vs whatever you're paying per month for the hosting provider. Not only will you be saving money, but you won't have any disk storage limitations and you can set up your server with CGI or PHP scripts or whatever else you want. Just be sure your site can handle the down-time you'll have when your home cable service or power goes out.
The port forwarding feature of a router can also be used to forward different types of Internet traffic to your server or to different devices. For example, if you were going to set up your Debian server as an e-mail server, you'd want to but in a second entry to forward port 25 (the SMTP port) traffic to your Debian server.
Setting Up An IP Cam
Another example would be to set up an IP camera (also referred to as a network camera) at your home that could be viewed from anywhere on the Internet (or made a part of the Web pages on your Web server). Note that an IP camera is not the same as a typical "Web cam" that connects to a computer. An IP camera is a stand-alone device that contains it's own internal Web server. As such it acts like a stand-alone server.
IP cameras used to costs hundreds of dollars (and the high-end models still do). However, you can now get a low-end IP cam like the
Trendnet TV-IP100 for around $85. Setting up one of these units for Internet viewing is pretty easy.
Because these cameras are self-contained Web servers, they are set to "listen" for requests on port 80 by default. However, port 80 is already being used by our Web server so we need to change that. This is easy to do because we have to go into the Configuration/Network setup menu in the camera in order to change the IP address anyway.
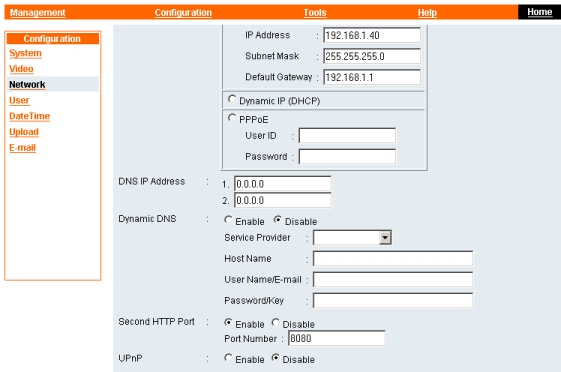
Note that in the above camera configuration page we set the IP address to 192.168.1.40 and set the port the camera should listen on to 8080. (You can use your own values of course.)
Next, we set the cable/DSL router to route port 8080 traffic to the IP camera.
You can browse to your camera from your internal network by using it's IP address and port number as so:
http://192.168.1.40:8080
In order to browse to the camera from the Internet you'll either need to know the external IP address of your router (the IP address assigned to you by your broadband provider) or you'll want to use your own domain name with a dynamic DNS service (see our DNS page for information on how to set that up). If you have this set up already for your Web server, then the URL would be something like:
http://www.you-last-name.net:8080
If you want to set up multiple cameras, you'd just set each camera to use a different port, and put a corresponding entry in the router for each camera.
Setting Up An Apache Web Server 
As shown back on the Packages page, all we need to do to install Apache is the command:
apt-get install apache
and accept the default No answer when prompted about suExec. We also mentioned that the installation sets up Apache to start automatically when the system is booted. We also showed how easy it was to uninstall Apache.
One thing you may want to do is save a copy of that original Apache/Debian home page with all of the file locations that you may have seen back on the Packages page. To do that, simply type in:
cp /var/www/index.html /var/www/index-org.html
We also showed you how easy it was to uninstall Apache. If you want to play around with a Web server that has support for SSL (Secure Sockets Layer) for accepting secure transactions, you can do that uninstall and install the apache-ssl package instead. However, since the servers we set up on these pages are not very secure, you wouldn't want to use this SSL server in a production environment. SSL will let you encrypt information that is submitted to the Web server, but if the underlying OS is not secure that sensitivie information can be stolen off the disk. You'd also need to get a certificate from an outfit like Thawte or Verisign in order to use the SSL capabilities of the Web server. (They offer temporary certificates for free that you can use for testing.)
The main configuration file for Apache is the /etc/apache/httpd.conf file. Like just about every Linux/UNIX configuration file, it is a plain old ASCII text file so you just use a text editor to make changes to it.
Luckily, the defaults in the configuration file are pretty much what we need. About the only thing you need to change is the domain name and the e-mail address for the Webmaster. The e-mail address is needed because some error pages that Apache generates include an e-mail link. You may also want to make a copy of the original configuration file should you hose things up playing around with it:
cp /etc/apache/httpd.conf /etc/apache/httpd-org.conf
That way, if you do hose up the configuration file, or you want to start over with a vanilla configuration, you can just copy the original back like so:
cp /etc/apache/httpd-org.conf /etc/apache/httpd.conf
If you're new to Linux or some particular application, it's probably a good idea to always make a backup copy of the original configuration file(s) before you start making changes. That way you can always get back to square one easily if you start having problems.
You can open the httpd.conf file by typing in:
nano /etc/apache/httpd.conf
You can use the Page-Down and Page-Up keys to move through the file. Press the Page-Down key until you see a line that looks like this:
ServerAdmin you@your.address
Change the e-mail address to that of a valid one for the person who will be managing the server.
Down a little further you'll see the line:
ServerName localhost
Remove localhost) and replace it with your server's IP address. For example:
ServerName 192.168.0.10
Then press Ctrl-X and 'y' at the prompt to save the changes and hit Enter to save the file.
We want to enable support for SSI (Server Side Include) directives because we'll use it on the Syslog Server page. (Don't confuse SSI with SSL Secure Sockets Layer for secure Web browswing - they're two entirely different things.)
SSI uses statements (called 'directives') embedded in the HTML code of Web pages (kind of like PHP). The directives retreive certain information, such as date or time or even the contents of other files (for instance to have common header and footer HTML for all your Web pages), and then Apache includes this information when it sends the page to the browser in place of the directive. Apache won't look through ('parse') HTML pages looking for SSI directives by default. We have to do two things to enable it:To have Apache load the includes module we need to edit a second configuration file with the command:1. Have Apache load the includes module when it starts
2. Give HTML files a .shtml extension
nano /etc/apache/modules.conf
and add the following line to the end of it:
LoadModule includes_module /usr/lib/apache/1.3/mod_include.so
(Note that there's no 's' on the second 'include'.) Now we have to restart Apache with the command:
/etc/init.d/apache restart
That's all there is to it! You're now ready to start serving up Web pages. The important file locations for Apache on a Debian system are:
Configuration files directory (aka "ServerRoot") - /etc/apache - Web page files directory (aka "DocumentRoot") - /var/www
- CGI scripts directory (aka "cgi-bin") - /usr/lib/cgi-bin
- Log files directory - /var/log/apache
- The apache executable file - /usr/sbin
You can tell which version of Apache you're running using the command:
/usr/sbin/apache -v
Once you've got the server configured you have to start putting your Web pages in the "document root" directory. As shown above, on a Debian server the DocumentRoot for the main Apache server is:
/var/www
Lets use our text editor to create a page that tests out the SSI functionality of our server. Enter the command:
nano /var/www/test.shtml
and enter the following HTML code into it:
Note that the only content of our Web page is an SSI directive to get the system environment information. Exit the editor saving the file. Now go to a different system on the network, fire up a Web browser, and enter the URL using the server's IP address like so:
http://192.168.0.10/test.shtml
If your Debian system isn't on a network or you don't have access to another machine but you still want to see if it works, you have a couple options. You can fire up the GUI and Mozilla on the server machine itself and enter the following URL in the browser:
http://127.0.0.1/test.shtml
You can also ask a friend or family member in a different part of the country to see if they can access it over the Internet. We showed you how to do that using a modem back on the Modems page. In addition, your ISP may not monitor for multiple connections under the same user ID so if you have two phone lines you could connect your server to your ISP using one phone line and connect a Windows PC to your ISP using the other and test the server that way. Once your Debian system is connected to your ISP on one phone line, use the
ifconfig
command to see what IP address your ISP assigned to the ppp0 interface (modem). Then, once you connect to your ISP using your other system, you would fire up the browser and enter the IP address or your Debian system in the browser's location/address line. For example, if the Debian PC's ppp0 interface was assigned an IP address of 172.28.151.78 you would enter the following URL in your browser on the other system:
http://172.28.151.78/test.shtml
Granted you'll only be going through your ISP's network instead of truly going over the Internet, but it'll give you some idea as to the response of the system over a dial-up connection.
Apache allows you to host multiple Web sites (multiple domains) on a single server. This is done through the use of the VirtualHost directive in the httpd.conf file. Web hosting companies make heavy use of this directive, often putting as many as 250 Web sites on a single server. (Now you know why there are so many small Web hosting companies out there. The ability to set up an unlimited number of servers at no cost using Linux, coupled with the ability to host so many sites on each server, makes Web hosting a low-cost startup proposition.)
In addition to setting up multiple virtual Web servers, the virtual host configuration statements also allow you to customize the behavior of each individual virtual server. This includes specifying file locations for DocumentRoot and CGI-BIN directories. There are virtual hosts and then there are named virtual hosts. The advantage of named virtual hosts is that they can all use the same IP address. The DNS records for multiple domain point to the same IP address. It's up to Apache to look at the URL request that came from the client browser to see which virtual host the request should go to.
If you think about that for a minute, using named virtual hosts will allow you to run multiple Web sites from your one little home Web server. You go to a place like EasyDNS.comand spend 35 bucks to register a domain name and set up dynamic DNS for it (we show you how on the DNS page) and then just add the virtual site directives (shown below) to your Apache configuration file for that site. Repeat that process for each domain/site you want to host on your server. Each member of your family could have their own domain and their own Web site hosted on your home Web server.
The virtual host configuration statements are in the httpd.conf file. They basically duplicate the configuration statements found earlier in the file, except that they are enclosed in a set of VirtualHost statements.
  NameVirtualHost *
  <VirtualHost *>
      ServerName www.myfirstsite.com
      ServerAdmin you@your-real-email-address.com
      ScriptAlias /cgi-bin/ /usr/lib/cgi-bin/myfirstsite/
      DocumentRoot /var/www/myfirstsite/
      <Directory /var/www/myfirstsite>
        AddType text/html .shtml
        AddHandler server-parsed .shtml
        Options +Includes
      </Directory>
      <Directory /usr/lib/cgi-bin/myfirstsite>
        AllowOverride None
        Options +ExecCGI -Multiviews
		Order allow,deny
		Allow from all
      </Directory>
      ErrorLog /var/log/apache/myfirstsite-error.log
      CustomLog /var/log/apache/myfirstsite-access.log common
  </VirtualHost>
  <VirtualHost *>
     2nd site directives
  </VirtualHost>
  <VirtualHost *>
     3rd site directives
  </VirtualHost>
Note that it's helpful to create separate subdirectories under the main DocumentRoot directory for each site you will be hosting. The same should be done under the main CGI-BIN directory also. This allows you to keep their pages and scripts separate. Giving the access and error logs site-specific names (or storing them in site-specific subdirectories) is also helpful.
The <Directory /var/www/myfirstsite> directive (and it's associated closing statement) are only necessary if you want to change any of the default values for an individual site's DocumentRoot directory. The "default" values are those which are inherited from the main site's configuration values. For example, if you were to use +Includes in the main site's options configuration it would not be necessary to have theOptions +Includes statement within the above Directory tags.
If Includes is not enabled in the main site's configuration and you want to enable it, you have to explicitly state so using the above commands for each virtual site. Enabling Includes allows you to use SSI directives like include (to read in text files containing HTML code for common parts of Web pages like sidebar menus) and exec (to call CGI scripts) on your Web pages. SSI stands for Server Side Includes meaning that some action is performed on server and the results are included with the document sent to the browser.
Note that the above Directory directive references the DocumentRoot subdirectory for the virtual site. In this case, only the HTML document files stored in this subdirectory are the ones that will be parsed to see if they contain SSI directives.
"Parsing" is when the server "looks through" the HTML file before sending it off to the browser. If it finds any SSI (Server Side Includes) "directives" (commands), it processes those commands before it sends the page to the browser. This is because most SSI directives will affect page content. For example, there's an SSI directive to retreive the current date and time from the system clock and include it in the Web page that's sent to the browser. SSI directives can also call CGI scripts which generate output that can be displayed on a page, such as an incremented hit count. Typically, servers will only parse an HTML file that has a .shtml extension but this can be changed to include .htm and .html files if desired.It's important to remember that normally each Web site you host must have it's own static, public IP address. This is because the DNS record for the domain must point to a specific IP address. As a result, you'll have to assign multiple IP addresses to the system's single network interface. (We showed you how to do that on the Networking page.) However, there is a way you can host multiple Web sites using a single IP address and it involves using Apache's "name-based virtual hosting" which we won't get into here.
Note: Apache actually has two primary configuration files. The httpd.conf file and the srm.conf file. In the past few years the move has been to put many of the statements (cgi directives, server parsing directives, etc) in the httpd.conf file instead of their traditional location in the srm.conf file. This is so that the srm.conf file can be eliminated.
However, Debian still has many directives in the srm.conf file. If you've worked with Apache on different platforms (Solaris, Red Hat, etc) and you don't see a directive in httpd.conf you may want to check the srm.conf file.
Where to learn more - The best of our bookshelves:
More info...Trust me, Linux Apache Web Server Administration is the only Apache book you'll need. It thoroughly covers Apache and all the goodies including both IP-based and name-based virtual hosting, advanced directives, CGI, SSI, SSL, redirection, and using modules. If you want to set up a Web server that requires someone to log in to view the site's contents there's an entire chapter on options for how to do this. He also gives some sample Web pages (the HTML code for them) that you can use to securely monitor your Apache server over the Web and test out SSI. It's written in a manner that's easy for Apache newbies to understand while not boring those with some experience with it. The file locations given in the book are for a vanilla Apache installation and most Linux distributions tend to rearrange things a bit. However, that's an easy adjustment to make. (See our list of file locations above.)
Testing Apache
You can use telnet to act like a browser to test out Apache. You can use any computer on the same local network to run telnet and connect to port 80 (that's the port HTTP listens on) on the server to issue the commands. Assuming your Debian system's IP address is 192.168.1.10 the following command will connect you to the HTTP service. On a Windows system, click on the Start button and select Run and enter the command in the input field.
telnet 192.168.1.10 80
If you don't have another system to try this from you can get on the Debian system and enter the above command using localhost in place of the IP address. Once you're connected (you won't see anything appear on the screen upon connection), type in the following command being sure to use the upper-case syntax as shown:
GET / HTTP/1.0
and press Enter twice. You should see the HTML code of the home page go flying by. The first slash in the command is the page specification. When no page is specified the home page (i.e. index.htm) is returned. To specify a page, enter the page name after the slash (i.e. /test.shtml).
Above the page's HTML code is the HTTP "header". You probably didn't see it as the HTML code went flying by but it looks something like this:HTTP/1.1 200 OKYou can also see this information by entering this command while still telneted into port 80 of the server:
Date: Mon, 15 April 2002 22:18:37 GMT
Server: Apache/1.3.29 (Debian GNU/Liux
Connection: close
Content-Type: text/html; charset=iso-8859-1
HEAD / HTTP/1.0
(Be sure to press Enter twice after entering it.) Why would you want to do this? For troubleshooting and testing mainly. Some times you'll try and pull up a Web page and get nothing but a blank white background. The above GET command will show you what, if anything, the Web server is sending the browser.
You can also see the output generated by certain CGI scripts (scripts that generate output intended to be displayed on Web pages) that you may have installed. Simply specify the path and name of the script in the GET command:
GET /cgi-bin/hitcount.cgi HTTP/1.0
Another reason is automation. Do you check certain Web pages on a daily basis (or would if you had time)? Once you get good at script writing you could probably write a script that would retreive a page, parse it for desired information and extract it when it finds it, and then e-mail just that information to you.
Secure Web servers, the type that use SSL for https-type connections (the type that give the closed-lock symbol on your browser's status bar), are not for the casual server administrator. Having a secure Web server not only involves having the SSL software added to your Apache installation as we mentioned near the top of this page, but requires that the operating system be hardened to prevent unauthorized access. Then there's the issue of obtaining an SSL "certificate" from an outfit like Verisign and installing that on the server (and they have to be renewed annually for a fee). If you're collecting or serving data that requires a secure connection, chances are the sources of that data would sue you if it ever got into the wrong hands. These types of secure servers are best left to professional hosting companies, whether they be for e-commerce or other functions. That's not to say you should never try and set up an SSL Web server. Just be prepared to do a considerable amount of studying and work. You'll need to be knowledgable not only in the areas of SSL software for Apache and server certificates, but quite a student in the area of overall Linux OS security as well.
Different from secure Web servers is securing your Web server. If you plan to set up a production Web server, get everything (Apache, CGI, PHP, MySQL) configured and then install the libapache-mod-chroot package to put your Apache installation into a "jail" to insolate it. We cover jails, and the installation of the libapache-mod-chroot package, on our Security page.
PHP and MySQL
It's so common these days to use PHP and MySQL with Apache that such servers are referred to simply as LAMP servers (Linux, Apache, MySQL, PHP). Whereas installing Apache alone allows you to serve up static "brochure" type Web pages, CGI, PHP, and MySQL can turn you Web server into an Internet application server.
Now that we've got a fully functional Apache Web server, we can add PHP scripting support to it. PHP can be added in one of two different ways. You can add it as an Apache module, or it can be run via CGI. Running it via CGI is mainly for when you want to add PHP support to a Web server other than Apache. Since we're running Apache, we'll use the module method.
Note: Many of the PHP packages offered in Debian come in two versions, PHP3 and PHP4. Make sure you install the PHP4 versions of any additional packages. Also, a few packages come in two flavors. One flavor for when you run PHP as an Apache module and another flavor for when you run it using CGI. If you install any of these packages be sure to install Apache flavor.Adding PHP support to your Web server is a good idea even if you don't plan on using MySQL. Like Perl CGI sripts, there are a ton of freely downloadable PHP scripts available on the Web. (Whereas Perl scripts are contained in their own separate file, PHP scripts are contained in Web (html) pages which are given a .php extension.)
If you changed the /etc/apt/sources.list file pull package updates over the Internet and change it back to read off the CDs (by uncommenting the CD lines and commenting out the http lines). To add PHP4 to your server enter the command:
apt-get install php4
Accept the default "keep your currently-installed version" when asked about the modules.conf file. We'll take care of that manually by enterting the command:
nano /etc/apache/modules.conf
At the bottom of file add the following statement (if necessary - it may already be there):
LoadModule php4_module /usr/lib/apache/1.3/libphp4.so
Then exit the editor saving the file. You'll also want to configure PHP to work with the MySQL database. To do that open the PHP configuration file with the command:
nano /etc/php4/apache/php.ini
Look for the Dynamic Extensions section in the file for the line:
;extension mysql.so
and remove the ; character from the beginning of the line to uncomment it. Note that further down in the file under the Module Settings section there are a lot of variables to control operations for MySQL. Then exit the editor saving the file.
There's a lot you can do with PHP that doesn't have anything to do with databases. However, if you want to use your PHP pages to access MySQL databases, you'll have to install MySQL and a libraries package. To install the MySQL package, enter:
apt-get install mysql-server
Select Yes to start MySQL at boot up and take note of the information given on the Install Hints screen.
Now we install the library files with the command:
apt-get install php4-mysql
That's it! All we have to do is restart Apache so the PHP module gets loaded with the command:
/etc/init.d/apache restart
You can verify that Apache is now supporting PHP by creating an HTML file with the command:
nano /var/www/test.php
and add the following lines to it:
<html>
<body>
<?php phpinfo(); ?>
</BODY>
</HTML>
Exit the editor saving the file and get on a system that's on the same network as your Debian system and fire up the Web browser and see if you can pull up the PHP page. If your Debian system has an IP address of 192.168.0.10 then you'd enter the following URL in your browser:
http://192.168.0.10/test.php
If your Debian system isn't on a network you can start up the GUI, fire up the Mozilla browser, and replace the address in the above URL with 127.0.0.1 (the local system's loopback address). While the above HTML code doesn't look like much, you'll get a LONG page with all kinds of system and environment information. Most of this is a result of the phpinfo() function embedded in the HTML.
As with any programming language, scripting languages included, it's always good to have a test server to test out new pages and code development. One error in the code can crash a server or cause an endless loop bringing a server to its knees. As you can see, setting up a test PHP server is easy so there's no reason to risk bringing down a production Web server if you plan to do any PHP development.
When using PHP pages to access a MySQL (or any other) database, you can have the Web server hosting the PHP pages be on a separate system from the database server running MySQL. This is most often the case if your database is accessed by both external visitors to your Web site and internal company employees. In this instance, you can put the Web server inside the DMZ and the database server on the internal LAN. Then you'd just set up the appropriate rules on the inside firewall to allow traffic between the two systems. (We cover this on the Firewalls page.) However, there's no reason why both PHP and MySQL can't be set up on the same system if they'll be accessed exclusively by either internal employees (locate it on the LAN) or external Web visitors (locate it in the DMZ). One exception to this may be if the data you collect on via a Web site and store in the database is of a sensitive or private nature. In this case, the data would be more secure if it was stored on a separate database server that's not located in the DMZ.
On the Database Server page we'll show you how to use MySQL to create a database and try a test to make sure the Debian system is indeed acting as a database server.
Setting Up A Sendmail E-mail Server 
Debian installs the Exim mail server software by default when you do even a basic installation. Sendmail is much more widely used and much more powerful. It's sendmail.cf configuration file is legendary in it's complexity. But due to its complexity, if you ever need any special configuration features, there's likely a way to set up exactly what you want.
Also included with Debian is a package called MailScanner that you can use on your e-mail server to scan incoming attachments for viruses. A link to the MailScanner Web site is given on the Resources page.
There's actually two server services involved with a mail server. First, you have an MTA (Mail Transport Agent) that is responsible for exchanging mail with other mail servers and forwarding mail that is being sent by clients. This is the part that Sendmail handles (i.e. Sendmail is an MTA).
Then there's the service which allows POP clients to log in and retrieve their mail from the server. The mail messages are transferred from the user's "mailbox" (a file) on the server to their "inbox" (a file) on the user's local hard-drive. Sendmail doesn't do POP so we need to install that separately.
The MTA service uses the SMTP (Simple Mail Transfer Protocol) protocol to transfer and forward mail. The POP service uses the POP3 (Post Office Protocol v3) to send messages from the server to the client. You'll see examples of both of these protocols in action later in this page.Terminology:If you didn't edit the /etc/resolv.conf file back on the Modem page, you'll want to
- MTA - Mail Transport Agent The server-based application that routes mail from MUAs (clients) to other MTAs and accepts mail from other MTAs. Sendmail is the most popular MTA. Exim and Microsoft Exchange are others. MTAs use the SMTP protocol to accept and route mail from MUAs and to send/receive messages to/from other MTAs.
- MUA - Mail User Agent This is the nerd term for the e-mail reader client software run on most PCs. Common MUAs are pine and elm (UNIX/Linux), Netscape Communicator, Eudora, and Microsoft Outlook (Windows). They use the SMTP protocol to send messages and the POP protocol to retreive messages.
- SMTP - Simple Mail Transport Protocol "Protocol" is just a fancy term for "a set of rules that you have to follow". With SMTP (and many other communications protocols) the "rules" are the commands and their syntax (which you will see in action below). The SMTP protocol is a set of commands used to communicate with/between MTAs. SMTP listens on port 25.
- POP - Post Office Protocol A message retrieval protocol (commands) used to communicate with a POP service running on a mail server. The most commonly-used versions are POP2 and POP3. popd is one of the most common POP daemons run on mail servers. An MUA uses POP commands to communicate with the POP service (daemon) to retreive any messages stored in a mailbox file. IMAP (Internet Message Access Protocol) is another common message retrieval protocol. POP listens on port 110.
go back there and enter your ISP's DNS server settings (or whatever DNS server settings your network uses).
It doesn't matter if you don't have a real domain name. If you just want to try this for fun you can send out Internet e-mail from the non-existant domain name you may have entered when you installed Debian (recall we recommended using your-last-name.net as your domain name). Even with this non-existant domain name however, your mail server won't be using your ISP's mail server for anything. It will be a stand-alone mail server sitting on the Internet able to directly send e-mails. In order to receive e-mails we'd need to set up DNS which we cover on theDNS Services page.
In the real world, Sendmail can act as a mail server for your internal or home network only, or it can handle your internal mail and your external (Internet) mail provided you have a valid domain name. You can even send messages to different users on the same machine. For example, during the installation you created a user account. While logged in as root, you could send an e-mail to this user and the view it the next time you log in as that user. To do this you enter only the user name in the "To:" field.
In the case of a real mail server, it is tempting to connect your mail server to the Internet and your local LAN so that users can retrieve their mail messages directly from the server over a LAN segment. However, whenever you connect a server to an internal network and the Internet it's a security risk, acting as a bridge between the two networks.
You're better off only connecting the systems to the Internet and letting your users retreive their mail from the server over your Internet connection. The most efficient way of doing this is to set up pop clients (mail readers) on the users workstations to access the mail server using the IP address of the server's interface connected to the Internet. By using the IP address no DNS queries need to be made. If there will be a firewall between your mail server and your internal network you have to be sure to allow POP and SMTP traffic (ports 110 inbound and 25 outbound respectively) through the firewall.
The first thing you have to do is install the Sendmail package. (When you install Sendmail, apt will remove Exim.) To install it you simply enter the command:
apt-get install sendmail-bin
and you'll will be prompted to insert the Debian CD #1. During the installation you'll see some error messages because we never configured Exim. These can be ignored.
Sendmail advises against editing the sendmail.cf configuration file directly. Configuration is typically done using a utility called the "m4 processor". You place easier (somewhat) to understand statements in the sendmail.mc configuration file which m4 uses as input. Based on the statements in the sendmail.mc file m4 spits out the corresponding sendmail.cf configuration file which is read directly by Sendmail when it starts up.
Debian has it's own Sendmail setup utility (which uses m4) to configure Sendmail. Before we run it we need to make some changes to the sendmail.cf configuration file. At the shell prompt type in
cd /etc/mail
to switch to the directory where the Sendmail configuration files are stored. While in the /etc/mail directory open the sendmail.mc file with the nano text editor by typing in:
nano sendmail.mc
Comment out the following three lines by putting dnl in front of them so they look like this:
dnl FEATURE(`no_default_msa')dnl
dnl DAEMON_OPTIONS(`Family=inet, Name=MTA-v4, Port=smtp, Addr=127.0.0.1')dnl
dnl DAEMON_OPTIONS(`Family=inet, Name=MSP-v4, Port=submission, Addr=127.0.0.1')dnl
Arrow down the end of the last line in the file and press Enter to create a blank line and enter the lines below.
Note that while local and smtp is enclosed in single quotes, note that they are NOT the same quote character. The first (opening) quote is the key that's in the upper-left corner of most keyboards while the second (closing) quote is the key that's next to the Enter key on most keyboards.
MAILER(`local')dnl
MAILER(`smtp')dnl
Cw debian.your-last-name.net
Cw your-last-name.net
Replace the above FQDN and domain name with your values. Then exit the editor saving the file. Now configure Sendmail by typing in the following at the shell prompt:
sendmailconfig
and pressing Enter. You'll be asked a series of questions. Answer them as follows:
- Accept the default Yes to the prompt about using the sendmail.conf file by pressing Enter
- Accept the default Yes to the prompt about using the sendmail.mc file by pressing Enter
- Accept the default Yes to the prompt about restarting Sendmail with the new configuration by pressing Enter
That takes care of Sendmail. Note that you can change your Sendmail configuration any time by changing the values in the /etc/mail/sendmail.mc file and re-running the sendmailconfig utility.
Now you'll also want to edit the /etc/hosts file.
nano /etc/hosts
and make sure the line for the local system contains the following:
- the IP address of your system followed by a Tab character
- the host name of your system followed by a Tab character
- the FQDN (Fully Qualified Domain Name) of your system followed by a Tab character
- the words loghost and mailhost separated by a space
When you make the changes the top of the file should look like this:
127.0.0.1        localhost.localdomain        localhost
192.168.10.10    debian.your-last-name.net    debian    loghost mailhost
Exit the editor saving the file. That's it! Your e-mail server is set up.
At this point you have to restart Sendmail because it only reads the configuration file when it starts. However, given the file edits we've made it may be wiser to just reboot the system.
If you read through ourDNS Services page and you're using a DNS service like EasyDNS.comDNS Services page after doing so.)
In the case of a real mail server you'd have to tell your ISP (or whoever is hosting your DNS records) to change the MX record for your domain so that it points to the IP address of the Internet-connected interface of the mail system (or of the firewall that's doing a static address translation to the mail system).
The important file locations for Sendmail on a Debian system are:
- Configuration files directory - /etc/mail
- Incoming mail queue directory - /var/spool/mail
Messages are stored in files with names that match each username. These are the user "mailbox" files that are kept on the server. Each mailbox is a single file that can contain multiple messages. This file is usually cleared out when a user's POP client downloads their messages to their inbox (unless the POP client is set to "leave messages on server").
- Outgoing mail queue directory - /var/spool/mqueue
With a full time Internet connection this directory should be empty because the messages will get sent out as soon as the recipient's domain name is resolved via DNS (i.e. almost immediately).
- The Sendmail executable file - /usr/sbin
To find out what version of Sendmail you're running, as well as some other information which will allow you to verify your Sendmail configuration, use the command:
/usr/sbin/sendmail -d0.4 -bv root
The version number is the first line to be displayed so if so much information is displayed that it scrolls off the top of the screen you can either pipe (i.e. append| more to the end of the above command) or press Shift-PgUp to scroll the display up.
Where to learn more - The best of our bookshelves:
More info...O'Reilly's book Sendmail, commonly referred to is "the bat book", is the industry bible when it comes to Sendmail. However, it's definitely not the first book on Sendmail you want to read. Linux Sendmail Administration is the companion to the above Apache book and is just as well written (enjoyable for both Sendmail newbies and those with some experience) and just as wide in it's coverage of the application. In addition to installation and configuration (both m4 and manual), chapters address implementing anti-spam measures and application security. It also covers all of the technical goodies of Sendmail such as uing databases and rewrite rules. However, this isn't until after the first two chapters show how Internet e-mail works and present a high-level overview of the functional parts of Sendmail. Having wrestled with Sendmail a few times in the past I can tell you that a book like this was sorely needed.
Note that the Sendmail people only support using the 'm4' processor to configure Sendmail (not the sendmailconfig utility provided by Debian). The usage of of m4 is covered in the above book.
The POP Server
Now we have to set up the POP server. There's a basic POP server included in the Debian packages called ipopd. To install it (you should know this by now) put the Debian CD #1 in the drive and type in:
apt-get install ipopd
Answer Yes to allowing insecure authentication and answer Yes again to installing libc-client without Maildir support.
On the configuration screen arrow down to 'pop3s' and press the Space Bar to de-select it. Then Tab to OK an press Enter.
If you want to test it, just get on a different system on your local network, fire up the e-mail client, and change the POP server settings to point to the IP address of your Debian box. You'll need to change the user name and password in the client to match the user account you created during the Debian OS install. A POP server will automatically see any user on the Debian system as an e-mail user and it will use the Debian user name and password.
Note that you typically can't enter more than one POP server in an e-mail client (like you can with IMAP servers). Because of this you'll have to delete your current POP server settings (likely the settings for your ISP) before you can enter your Debian system settings. If you don't know them by heart, be sure to write down the POP server name, user ID, and password of your current POP server settings before you delete them.
Testing Sendmail (SMTP)
You can use very basic mail program to try and send an e-mail. It gets installed by default when you install Debian.
Note: If you're using a fictitious domain name on your Debian mail server, don't send mail messages to those who receive their e-mail via an ISP. Many ISPs will resolve the domain of incoming mail to cut down on spam. You'll want to send it to someone at a school district, university, local government agency, or a mid-size company. These types of organizations may have their own mail server and typically don't do DNS resolving of incoming mail.To send an e-mail using the mail program:
- If necessary, use the pon command to connect to your ISP.
- At the shell prompt type in the word mail followed by the e-mail address of the recipient
(ex: mail junior@college.edu ) and press Enter.
- The Subject: line will appear so just enter an appropriate subject and press Enter.
- Type in the text of your message. You can hit Enter to insert line-feeds in your message if you want. Ask the recipient of the message to forward this message onto your regular e-mail address so you can take a look at it. If you're using a fictitious domain name you may also want to add a note telling them not to reply to the message. If they did, their reply would just get bounced back to them because their mail server would be unable to resolve your ficticious domain name.
- When you're done typing your message hit Enter to put the cursor at the beginning of a blank line and press the Ctrl-D key sequence.
- The Cc: line will appear where you can enter another address if you want.
- At this point, if you are connected to the Internet via an external modem, you may want to keep an eye on the Tx/Rx indicators. After you've entered a cc: address, or chose not to enter one, press the Enter key to send the mail. With the external modem you should see the indicators flash as your ISP's DNS server is contacted to resolve the recipient's domain name and the mail is sent.
After a minute or so type in mail on the command-line by itself (i.e. no e-mail address after it) it will check to see if you have any mail waiting for you. If your mail was rejected by the receiving SMTP server there should be an e-mail containing an error message as to why.
Troubleshooting
Because of Sendmail's complexity there are a myriad of error messages you could see in mail that gets returned to you. The sendmail.org Web site has extensive FAQs which list most of these errors and what to do about them.
If you run into a situation where your network clients are having problems sending e-mail you can pretend to be an e-mail client sending an e-mail by using telnet to issue SMTP commands to the server. You can use any computer on the same local network to run telnet and connect to port 25 (that's the port SMTP listens on) on the server to issue the commands. Assuming your Debian system's IP address is 192.168.1.10 the following command will connect you to the SMTP service. On a Windows system, click on the Start button and select Run and enter the command in the input field.
telnet 192.168.1.10 25
If you don't have another system to try this from you can get on the Debian system and enter the above command using localhost in place of the IP address. However, running telnet on the local server system won't tell you if you have a network connection problem with the e-mail server.
In the following example, the lines in bold are the commands you enter to pretend you're a mail client sending an e-mail message through the server. The lines in italics are the responses you should see from your server. Make sure that the mail server can "see" a DNS server, whether it be over an Internet connection to your ISP's DNS servers or your own local DNS server. (Use pon to dial into your ISP if necessary.) You'll be able to tell if your Debian server can't see a DNS server. It's responses to the commands you enter below will be VERY slow in coming. After you connect via telnet the server will respond and wait for your commands.
The your-id is the username of the user account your created during the Debian installation.
  (telnet connection established)

  220 debian.your-last-name.net ESMTP Sendmail 8.13.1/8.13.1/Debian-17;
     Fri, 26 Nov 2004 20:34:10 -0600 (CDT) (No UCE/UBE access)

  helo your-last-name.net

  250 debian.your-last-name.net Hello solarisi [192.168.10.30],
  pleased to meet you

  mail from: your-id@your-last-name.net

  250 2.1.0 your-id@your-last-name.net... Sender OK

  rcpt to: root@your-last-name.net

  250 2.1.5 root@your-last-name.net... Recipient OK

  data

  354 Enter mail, end with "." on a line by itself

  This is a test mail message sent to root
  .

  250 2.0.0 Message accepted for delivery

  quit

  220 2.0.0 debian@your-last-name.net closing connection
In the above example we were sending mail from a non-root user to the root user in the same domain (but using different systems). If you tried to use arcpt to: address that was not in the same domain you'd likely get a relaying denied error.
The most common SMTP return codes are as follows:
220 - Service ready
221 - Service closing transmission channel
250 - Requested mail action okay, completed
354 - Start mail input; end with <CRLF>.<CRLF>
421 - Service not available, closing transmission channel
450 - Requested mail action not taken: mailbox unavailable
500 - Command unrecognized (mis-spelled command or wrong syntax)
501 - Syntax error in parameters or arguments
502 - Command not implemented (valid SMTP command but not available)
550 - Requested action not taken: mailbox unavailable
551 - User not local; please try <forward-path>
554 - Transaction failed
POP Too
You can also use telnet to pretend to be a POP client as well. This time you connect to port 110 which is the port POP listens on. Again, using 192.168.1.10 as an example address for the server, enter the following command:
telnet 192.168.1.10 110
As above, you can also use the following command on the local system:
telnet localhost 110
In the following example, the lines in bold are the commands you enter to pretend you're a mail client checking for e-mail messages. The lines in italics are the responses you should see from your server. After you connect via telnet the server will respond and wait for your commands.
Note that you CANNOT try this using the root mail account because the password is sent in clear text. Use the name of the user account you created during the Debian installation.
  (telnet connection established)

  +OK POP3 debian.your-last-name.net v2003.03 server ready

  user keith

  +OK User name accepted, password please

  pass penguin

  +OK Mailbox open, 1 message

  list

  +OK Mailbox scan listing follows
     1 2050
	 2 4213
	 3 928
	 .

  retr 1

  +OK 2050 octets

     (header and message text gets typed to the screen)
	 .

  dele 1

  +OK deleted

  quit

  +OK closing connection
The dele dialog in blue is optional. You don't need to enter the dele command if you want to keep the message in your mailbox file on the server. It normally is used because POP clients transfer the mail from the mailbox on the server to an "inbox" on the client's hard-drive. In most POP client software (Netscape Communicator, Eudora, Outlook) you'll see an option to "leave messages on server". If this option is selected, the dele command isn't executed.
Internet Services and TCP Wrappers
If you set up your system according to the Installation and Packages pages on this site, you probably noticed that when you boot the system you see the following right above the the login prompt:
Starting mail transport agent: sendmail.That's no big surprise because we installed those packages. However, we also installed the ipopd and wu-ftpd server software packages. Where are they? They are handled a little differently.
Starting web server: apache.
If you look above the login prompt you'll also see the line:
Starting internet superserver: inetd.inetd is the daemon that idles in the background listening to the ports that certain Internet-based service requests (POP, telnet, FTP, etc.) come in on. When it detects a request on a specific port, it calls the appropriate process (server software program) to handle the request. This is also why you won't see POP or telnet or FTP listed if you issue the command:
ps -aux
to list all of the processes running on the server. You will however see the inetd process (daemon) running.
You control which ports inetd listens on by editing the /etc/inetd.conf file. A typical line in this file could look like this:
ftp stream tcp nowait root /usr/sbin/wu-ftpd
This line was added to the file when you installed the wu-ftpd package above. It is simply telling the inetd daemon to run the /usr/sbin/wu-ftpd program when a request comes in on the FTP port (Port 21). Note that I said the line could look like this. It likely doesn't. It probably looks like this:
ftp stream tcp nowait root /usr/sbin/tcpd /usr/sbin/wu-ftpd
Note the additional part in blue. This tells the inetd daemon to run the tcpd program when a request comes in on the FTP port. The /usr/sbin/wu-ftpd path to the ftp daemon is used as a command line parameter to the tcpd program. The tcpd program is run first and it "calls" the wu-ftpd program.
What is tcpd? It's called a TCP "wrapper" because it runs the actual program within itself. It wraps itself around the execution of the actual program so it can watch the traffic that goes in and out of the program. It's a security tool.
When you use the tcpd wrapper program you can control it using the /etc/hosts.allow and /etc/hosts.deny files. Just as the file names imply, the TCP wrapper allows you to control who can access these services.
For example, you can allow only a specific computer to telnet into your server by specifying that computer's IP address in the /etc/hosts.allow file. If you enter only the first two or three octets of an IP address, only the machines that have addresses that start with those octets will have access.
The format of the statements in the two hosts files, and how the two files interact, are beyond the scope of this page. We just wanted to make you aware of what TCP wrappers are because you'll often see it mentioned in Web documents. It's a very useful and valuable security tool and it would be well worth your time to learn how to use it.
For example, you could set up a server at work to only allow telnet from systems on your home ISP's subnet so you can get at it from home. Yes, others on your ISP's subnet would also be able to telnet in if they were able to crack a username and password, but this is a lot more restrictive than the entire Internet. The reason you'd have to use your ISP's subnet is because your home computer is assigned a dynamic (changing) address each time you connect to your ISP so you wouldn't be able to use a specific IP address in the /etc/hosts.allow file.
In addition to controlling access through the use of the two hosts files, TCP wrappers also help to prevent spoofing attacks. Note that the 2.4 Linux kernel uses a program called xinetd in place of inetd. Setting your system up to use SSH (Secure SHell) access instead of telnet is also another good security measure as login information (username and password) are sent as clear text when using telnet. The unsername and password are encrypted with SSH. (See the Resources page for a link to a nice SSH client for Windows that is free for personal use.)
There are other ways to help secure a server also. As mentioned on the Basics page, you can customize runlevel 2 so that services like NFS and lpd don't start when you boot the server. This is done by renaming their symbolic links in the /etc/rc2.d subdirectory so their names don't start with an upper-case S.
SECURITY WARNING
Do NOT plan to use the system you will create using these guide pages as a "production" (real) server. It will NOT be secure!
There are many steps involved in creating a secure Internet or LAN server. While we do refer to some things you can do to make your system more secure, there are many other measures related to system security that also need to be taken into consideration and they are not covered on these pages.
These guide pages are meant as a learning tool only. The knowledge gained on these pages will help you understand the material covered in security-related publications when you are ready to consider setting up a production server.
Did you find this page helpful ?
If so, please help keep this site operating
by using our CD, gear, or book pages.
Site, content, documents, original images Copyright © 2003-2010 Keith Parkansky All rights reserved
Duplication of any portion of this site or the material contained herein without
the express written consent of Keith Parkansky, USA is strictly prohibited.
This site is in no way affiliated with the Debian Project, the debian.org Web site, or
Software In The Public Interest, Inc. No endorsement of this site by the Debian Project
or Software In the Public Interest is expressed or implied. Debian and the Debian logo
are registered trademarks of Software In The Public Interest, Inc. Linux is a registered
trademark of Linus Torvalds. The Tux penguin graphic is the creation of Larry Ewing.
LIABILITY
IN NO EVENT WILL KEITH PARKANSKY OR BLUEHOST INCORPORATED OR ANY OF ITS' SUBSIDIARIES BE LIABLE TO ANY PARTY (i) FOR ANY DIRECT, INDIRECT, SPECIAL, PUNITIVE OR CONSEQUENTIAL DAMAGES (INCLUDING, BUT NOT LIMITED TO, DAMAGES FOR LOSS OF BUSINESS PROFITS, BUSINESS INTERRUPTION, LOSS OF PROGRAMS OR INFORMATION, AND THE LIKE), OR ANY OTHER DAMAGES ARISING IN ANY WAY OUT OF THE AVAILABILITY, USE, RELIANCE ON, OR INABILITY TO USE THE INFORMATION, METHODS, HTML OR COMPUTER CODE, OR "KNOWLEDGE" PROVIDED ON OR THROUGH THIS WEBSITE, COMMONLY REFERRED TO AS THE "ABOUT DEBIAN" WEBSITE, OR ANY OF ITS' ASSOCIATED DOCUMENTS, DIAGRAMS, IMAGES, REPRODUCTIONS, COMPUTER EXECUTED CODE, OR ELECTRONICALLY STORED OR TRANSMITTED FILES OR GENERATED COMMUNICATIONS OR DATA EVEN IF KEITH PARKANSKY OR BLUEHOST INCORPORATED OR ANY OF ITS' SUBSIDIARIES SHALL HAVE BEEN ADVISED OF THE POSSIBILITY OF SUCH DAMAGES, AND REGARDLESS OF THE FORM OF ACTION, WHETHER IN CONTRACT, TORT, OR OTHERWISE; OR (ii) FOR ANY CLAIM ATTRIBUTABLE TO ERRORS, OMISSIONS, OR OTHER INACCURACIES IN, OR DESTRUCTIVE PROPERTIES OF ANY INFORMATION, METHODS, HTML OR COMPUTER CODE, OR "KNOWLEDGE" PROVIDED ON OR THROUGH THIS WEBSITE, COMMONLY REFERRED TO AS THE "ABOUT DEBIAN" WEBSITE, OR ANY OF ITS' ASSOCIATED DOCUMENTS, DIAGRAMS, IMAGES, REPRODUCTIONS, COMPUTER EXECUTED CODE, OR ELECTRONICALLY STORED, TRANSMITTED, OR GENERATED FILES, COMMUNICATIONS, OR DATA. ALL INFORMATION, METHODS, HTML OR COMPUTER CODE IS PROVIDED STRICTLY "AS IS" WITH NO GUARANTY OF ACCURACY AND/OR COMPLETENESS. USE OF THIS SITE CONSTITUTES ACCEPTANCE OF ALL STATED TERMS AND CONDITIONS.